by Kevin
Share
by Kevin
Share

Enjoying a warm, home-cooked meal even when you’re far from home is now easier than ever, thanks to the innovative self-heating lunch box. Whether you’re a busy professional, an avid camper, a student, or someone simply looking for a convenient way to heat up lunch without a microwave, understanding how to use this device effectively is key. This guide will walk you through the simple steps to get your meal heated up and ready to enjoy, ensuring you can savor delicious, warm food whenever hunger strikes.
Getting Started with Your Self-Heating Lunch Box
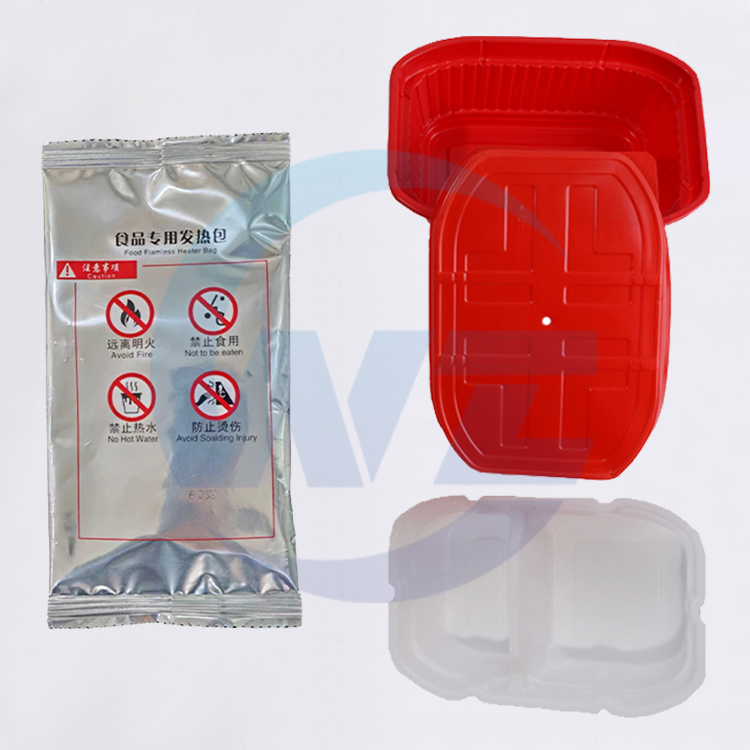
Before your first use, it’s essential to familiarize yourself with your specific lunch box model. While designs may vary slightly between brands, the fundamental principles remain the same. Most self-heating lunch boxes consist of two main compartments: one for your food and another, usually detachable or lower section, containing the heating mechanism (typically involving a mixture of water and an activating powder like calcium oxide).
Step-by-Step Activation Process
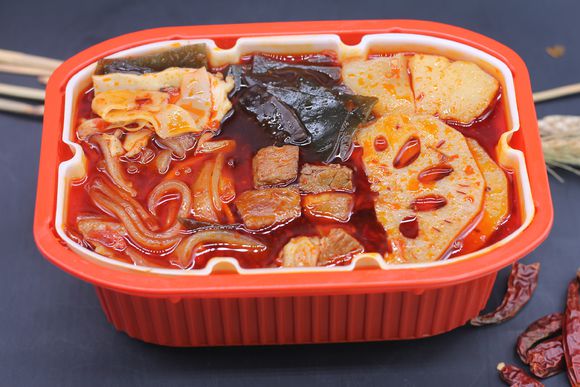
Prepare Your Food: Start by portioning your chosen meal into the designated food compartment. It’s important to note that self-heating lunch boxes work best with soups, stews, chili, pasta dishes with sauce, or other foods with a high liquid content. Avoid using them for dry foods like sandwiches or salads, as they won’t heat evenly or effectively. Ensure the food container is securely closed.
Prepare the Heating Chamber: Locate the heating chamber, often at the base of the unit. This usually contains a sealed water pouch and a compartment filled with the activating powder.
Initiate the Reaction: To start the heating process, you’ll need to break the seal on the water pouch inside the heating chamber. This is typically done by twisting a knob, pressing a button, or breaking a small internal seal, allowing the water to mix with the powder.

Assemble and Wait: Carefully reassemble the lunch box according to the manufacturer’s instructions, ensuring the food compartment is securely attached to the heating chamber. Give it a gentle shake to mix the contents of the heating chamber if required. Now, the chemical reaction will begin, generating heat. Most lunch boxes will reach a suitable temperature within 8-15 minutes. Checkyour specific model’s instructions for the recommended heating time.
Enjoy Your Hot Meal: Once the designated time has passed, carefully open the lunch box. The bottom section will be hot, so use caution. Stir your food well to ensure even heating. Your meal is now ready to eat! Use the provided utensils or your own.
Important Safety Tips & Best Practices
Read the Manual: Always refer to the specific instructions provided by the manufacturer for your model, as details can vary.
Ventilation: Use your self-heating lunch box in a well-ventilated area. While the chemical reactions are generally safe, proper airflow is recommended.
Handling: The heating chamber and the bottom of the lunch box will become very hot during and shortly after the heating process. Handle with care, using the designated carrying handle if available, and avoid touching the base directly.

Food Compatibility: Stick to moist foods for optimal results and safety. Do not attempt to heat flammable or volatile substances.
Children and Pets: Keep the lunch box out of reach of children and pets while it’s heating and until it has cooled down.
Disposal: After use, allow the heating chamber to cool completely. Dispose of the used heating elements (water pouch and powder compartment) according to local waste disposal regulations. Some components might be recyclable.
Maintenance and Care
Cool Down Before Cleaning: Allow the lunch box to cool completely before attempting to clean it.
Clean Separately: Typically, the food container is washable (check if it’s dishwasher safe). The heating chamber usually requires minimal cleaning, often just wiping out any residue once cool. Do not immerse the heating mechanism in water.

Storage: Store your self-heating lunch box in a cool, dry place, away from direct sunlight and moisture, to preserve the integrity of the heating elements.
Conclusion
The self-heating lunch box is a fantastic innovation for anyone needing hot meals on demand, away from traditional cooking facilities. By following these simple steps and safety guidelines, you can reliably enjoy warm, satisfying food anytime, anywhere. It’s an ideal companion for work, school, travel, camping trips, and emergency preparedness.
If you found this guide helpful or have questions about specific models, feel free to reach out. We’re here to help you make the most of your self-heating lunch box experience. Our team can provide recommendations based on your needs and answer any queries you might have. We welcome your inquiries and even offer the opportunity for on-site inspections if you’re local!
STAY IN THE LOOP